top of page

Pinch pot cut in half
-Get amount of clay needed
-Wedge clay
-Form clay into ball
-Push hole into ball
-Slowly form ball into bowl
This pinch pot went well, however I could have done a better job at evening out the majority of the pinch pot at the bottom, top and sides. If I were to redo this piece I would have made more of and even hole in the middle to create more of an even start for myself. I personally don't like making pinch pots but I'm glad I got to practice.
Unit 2

This piece turned out how I wanted, after making the pinch pot into a cup it was fired, I didn't have a use for this after it became bisque wear so I ended up leaving it on the shelf. The only thing that was somewhat challenging was forming the cut pinch pot back in half. If I were to redo this piece I would have glazed it and added some nice design and use it as a water glass. Looking back I could have make a handle and attached it to make a nicer mug, or put holes in the bottom to create a little berry strainer.
Pinch pot made into something useful
-Score the cut pinch pot back together
-Form pinch pot to be taller and thinner
-Smooth out imperfections
-Fire
Double pinch pot made into something useful
-Get two balls of clay
-Wedge both
-Make two pinch pots
-Put together
-Form bowl
.jpg)
I made this bowl out of tow decently sized pinch pots, this piece went well however I could have made it more even, but I did make it very chimerical which I am very proud of. It could have been thicker,at one point it did end up getting a chip in the side so I scrapped it eventually. I would have liked to keep this and glaze a nice design on it to create a nice serving bowl

This is my favorite piece I have made in ceramics yet. I enjoyed having the freedom to make what I want. I recreated a painting I found on Pinterest and and painted it onto a plate I made. Some things that went well with this piece were that I dried it slow enough that it didn't crack. The only thing I could have done better was that done more layers of clear glaze to make it more shiny. I also would have liked to add more designs to the background.
Choice project from unit 2
-Fined correct mold for plate
-Get clay
-Wedge clay
-Dry clay till leather hard
-Find correct glaze colors
-Create design
-Fire once
-Clear glaze
-Fire again
Unit 3

Slump Mold
Plan:
-Find mold
-Get right amount of clay
-Wedge clay
-Smooth clay into all areas of the mold
-Even out everything
This piece went well until I came back the following next class and it was cracked, If I remade this piece I would have dried it slowly to avoid cracking.I ended up scrapping this piece because I left it out to dry with no bag and it broke apart.

Sgrafifto
Plan:
-Find correct mold
-Get clay
-Wedge clay
-Even out clay in mold
-Dry till next class
-Glaze in color blue
-Carve design
I enjoyed making this piece, everything went well, but when it came time to take the clay out of the mold the rim cracked, I also make the bottom too thin. I scrapped it since it was to uneven and cracked. If I were to redo this I would not put clay on the rim and make the bottom thicker.

Relieve carving
-Get clay
-Form into thick slab
-Cut into circle
-Carve small shape into middle
-Fire
-Glaze
-Clear glaze
-Fire again

Coil build
-Find bowl mold
-Use outside of bowl as mold
-Get clay
-Wedge clay
-Spread clay on outside of bowl
-Use more clay and put through extruder to make long strips of clay for designs
I really liked the design I did on this piece, and enjoyed using the extruder for the first time. By rolling out the pieces of clay from the extruder to become thinner I was able to make longer and skinnier lines. Through using the extruder I realized that it only takes a short amount of time for the long stops of clay to dry out and become harder to use. Something that went well with this piece was that I got to have more experience with the extuder and how to properly use and clean it. I once again was not able to dry this piece at the proper speed which lead it to crack, so I scrapped it.
This is another piece I enjoyed making, I didn't have much of a thought process of what I wanted to do with this piece so I went with some suggestions from my class mates. Some things that went well with this piece was how the clear glaze came out, I was able to put enough coats of it for it to come out shiny. some things that went wrong with this was that it got a little chip on the bottom of the rim, I was able to make it look like it was intentional in the way it was placed. If I were to redo this piece I would have dried the piece slower so that it would have not cracked.


Slab with darts
-Get amount of clay needed
-Wedge clay
-Put clay through the slab roller
-Cut clay into a rectangle
-Use the special cutter
-Fold sides together
-Smooth out
-Cut diagonally at both angles
-Cut the four sections into triangles
-Put 4 triangles together
-Smooth out
Choice project for unit 3
-Get amount of clay needed
-Wedge clay
-Put clay through slab roller
-Make a slab with darts cup
-Use left over clay to make handle
-Score and slip handle to mug
-Glaze
-Fire once
-Clear glaze
-Fire once more
I was able to gain experience though making this piece. It took me multiple tries to figure out how thick the slab had to be to be able to hold it self up but not to thick to where it would be hard to score and slip. I enjoyed making this piece over all. After it had dried I put it up to fire and am unaware of what happened to it. If I were to remake this piece I would have spent more time trying to make the sides and the bottom smoother. I also would have liked to attach a handle and glazed it.
I really enjoy making choice projects I believe its a very open project where you can express yourself freely. For this piece I had a hard time figuring out what color I wanted to glaze it. I painted it about 3 different colors until I settled with this light green color which I think suits the piece well. I really enjoyed the way the handle turned out but it was very difficult to attach and deciding how I wanted it to look. If I were to recreate this piece I would have not glazed it a single color and maybe carved some kind of design into it.
Unit 4
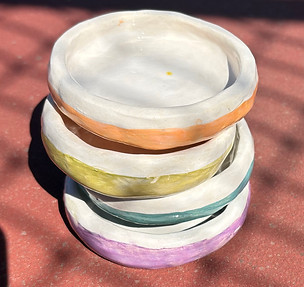
Set of four
-Get four balls of clay (same size)
-Wedge balls
-Shape all balls into bowls
-Paint inside of all the bowls white
-Paint rims of bowls different colors
-Fire
-Clear glaze
-Fire again
bottom of page